What Is Proofing Bread? Proofing vs Rising Explained
What You’ll Learn in 60 Seconds
- Proofing = the rise of dough from yeast fermentation. Bread has two rises: bulk fermentation (first rise) and final proof (second rise).
- Proofing vs rising: proofing is a kind of rising. In everyday recipes the words overlap, but bakers usually use “proofing” for the final rise after shaping.
- Bulk fermentation: before shaping, dough rises as one mass. Often 4-8 hours at room temp for sourdough, but temperature and starter strength matter more than the clock.
- Final proof: after shaping, dough rises in its final form. 1-3 hours room temp OR 8-16 hours cold retard (fridge).
- Poke test: fast spring back = needs more time. Slow spring back = ready. No spring back = overproofed.
- Key insight: Final proof expands the gas cells you see when you cut the loaf. Bulk fermentation built the structure that traps them.
Full 11-min guide with the difference between rises, timing for each, the poke test, and why cold retard makes proofing forgiving.
Proofing bread means letting dough rise through yeast fermentation. So, is proofing the same as rising? In casual recipes, often yes. In bread technique, rising is the broad word for dough expansion, while proofing usually means the controlled final rise after shaping. Once you understand that distinction, every recipe makes more sense, and you stop the most common over- and underproofing mistakes.
I confused bulk fermentation with proofing for my first half-dozen bakes. The recipe said “let the dough rise until doubled,” and I waited for doubling at every stage, both before and after shaping. The result was usually overproofed dough that came out flat with tiny uniform crumb.
The fix was understanding that the two rises do completely different things. Bulk fermentation builds flavor and gluten structure across the whole dough. Final proof inflates the shaped loaf and expands the gas cells in your crumb. Doubling during bulk often means the dough has gone too far, leaving less fermentation strength for the final proof.
Once I separated these stages mentally, with different visual cues, different timing, and different goals, my bread became consistent for the first time. The same recipes that had been hit-or-miss started working reliably. Most of the failures hadn’t been bad recipes. They’d been correct recipes interpreted with the wrong mental model.
The first rise builds structure. The second rise inflates that structure. Both are fermentation, but they’re not the same step, and treating them as one is the fastest way to overproofed bread.
What “Proofing” Actually Means
A word with two meanings
The word “proofing” gets used in two different senses, which is part of why it’s confusing.
Sense 1: Proofing yeast (verifying it’s alive)
Some recipes tell you to “proof the yeast” by mixing it with warm water and a pinch of sugar before adding to the dough. The yeast foams up if it’s alive. This is a verification step: you’re confirming the yeast hasn’t died on the shelf. Modern instant yeast doesn’t need this; older active dry yeast traditionally did.
Sense 2: Proofing the dough (letting it rise)
This is what most bakers mean when they say “proofing.” The dough rises because yeast eats sugars in the flour and produces CO2 gas, which gets trapped by the gluten network. The dough inflates, develops flavor, and becomes ready to bake.
This guide is about the second sense: proofing the dough.
Both rises are technically proofing:
Both bulk fermentation and final proof are the dough proofing. They’re two stages of the same biological process. But in everyday baker conversation, “proofing” usually means the final proof specifically: the rise after shaping, just before baking.
When a recipe says “proof the dough for 2 hours,” it almost always means final proof after shaping. When it says “let the dough rise” or “bulk ferment,” that’s the first rise before shaping.
Is Proofing the Same as Rising?
The short answer most recipes assume
Proofing and rising are closely related, but they are not always used the same way.
Rising is the broad term: dough gets bigger because yeast produces carbon dioxide and that gas gets trapped in the gluten network.
Proofing is the baker’s term for a controlled rise. In many recipes, especially beginner bread recipes, “proofing” and “rising” are used almost interchangeably. In more precise bread talk, proofing usually means the final rise after shaping and before baking.
| Recipe phrase | What it usually means |
|---|---|
| First rise | Bulk fermentation before shaping |
| Bulk fermentation | The first rise as one dough mass |
| Second rise | Final proof after shaping |
| Final proof | The shaped loaf rises before baking |
| Proof the yeast | Test yeast in warm water to confirm it is alive |
If the dough has not been shaped yet, the recipe is usually talking about bulk fermentation or first rise. If the loaf is already shaped, it is talking about final proof or second rise.
The Two Rises: Bulk vs Final Proof
Different stages, different goals
Almost every yeasted bread recipe, including sourdough, commercial yeast bread, pizza dough, and brioche, has two distinct rises. Understanding the difference is the single most important conceptual unlock for new bakers.
| Property | Bulk Fermentation (First Rise) | Final Proof (Second Rise) |
|---|---|---|
| When | After mixing, before shaping | After shaping, before baking |
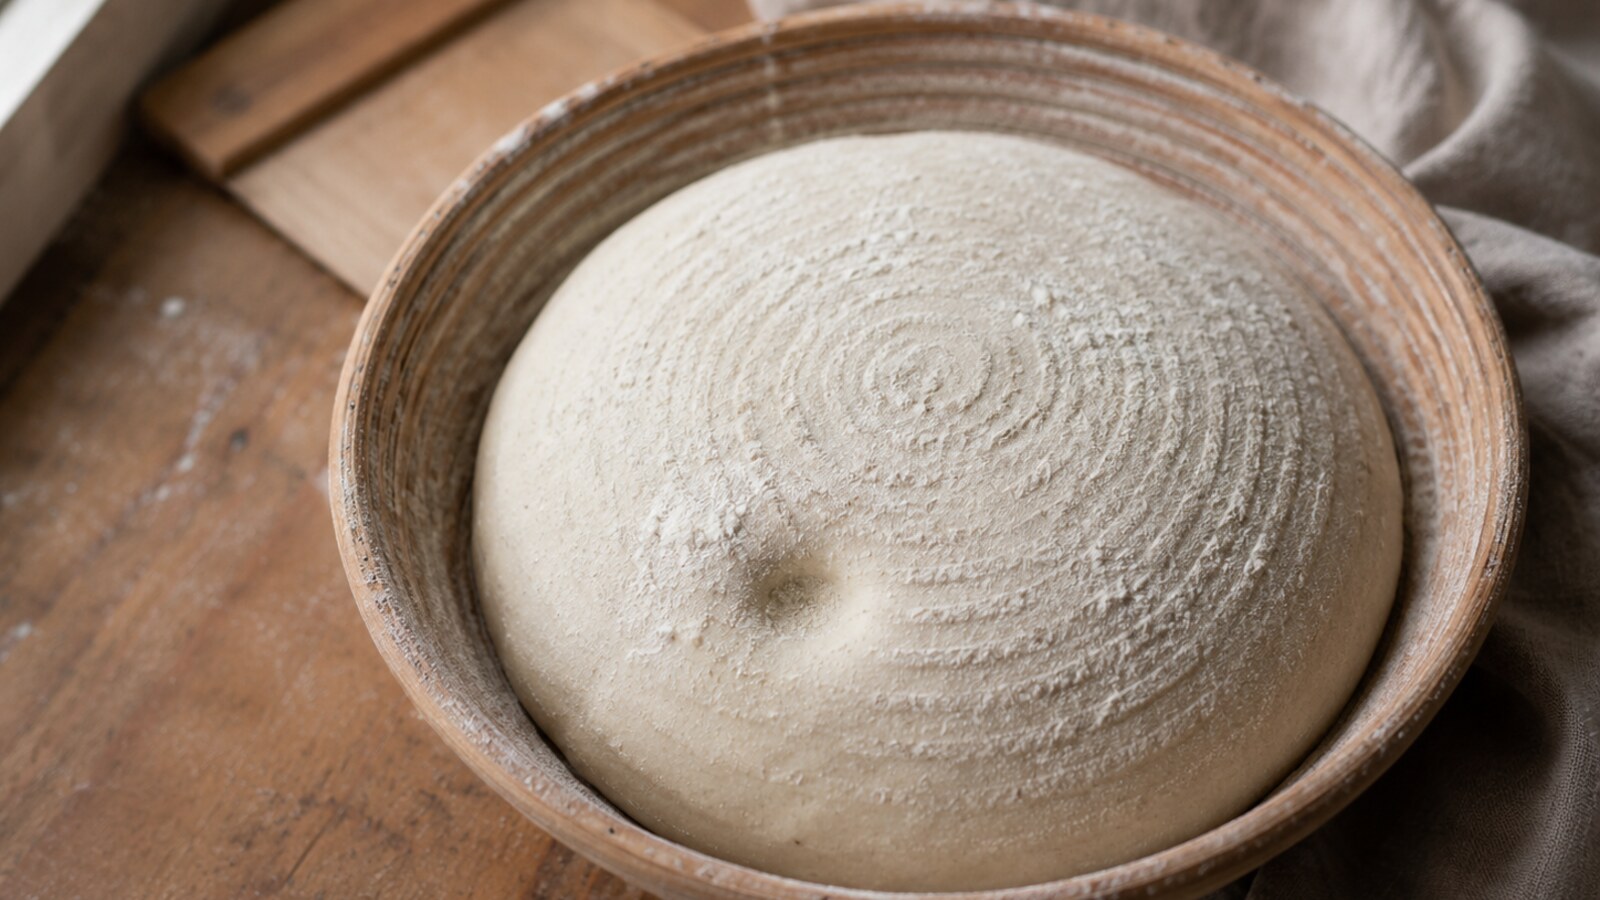
| Container | Bowl or clear container | Banneton, loaf pan, or shaping cloth |
| Goal | Build flavor, gluten, and gas | Expand the final crumb structure |
| Duration (room temp) | 4-8 hours at 72-75°F | 1-3 hours at 72-75°F |
| Cold retard option | Less common | Very common (8-16 hours) |
| Volume increase target | Often 50-75% for sourdough with standard bread flour | Usually a visible puff, not a full double |
| Visual cues | Bubbles, soft dome, jiggle | Slight puff, smooth surface |
| End test | Volume + tactile feel | Poke test |
| What ruins it | Underproofing or overproofing | Underproofing or overproofing |
The flow of a typical sourdough bake:
- Mix flour, water, starter, salt
- Bulk fermentation for 4-8 hours, with stretch-and-folds in the first 2 hours
- Pre-shape: quick gentle round on the counter
- Bench rest 15-20 minutes
- Final shape: into a batard, boule, or loaf
- Final proof for 1-3 hours room temp OR 8-16 hours in the fridge
- Bake
Steps 2 and 6 are the two rises. They’re separated by shaping (steps 3-5), which is what divides the same fermentation process into two stages.
Why Each Rise Matters
Different stages do different work
It’s tempting to think bulk and final proof are the same thing because both involve the dough rising. But the dough is in a completely different state during each.
During bulk fermentation, the dough is unshaped:
- Yeast produces gas across the whole mass
- Gluten develops through stretch-and-folds and time
- Acids accumulate, building flavor
- The whole dough fermenting together creates a unified texture
The goal of bulk is structural: build a strong gluten network full of gas and flavor compounds, distributed evenly throughout the dough.
During final proof, the dough is shaped:
- Gas accumulates in the shaped form
- The surface tension you built during shaping holds the loaf upright
- Pre-existing gas pockets expand into final crumb structure
- The dough develops the final shape it’ll have in the oven
The goal of final proof is structural too, but for the final loaf shape and crumb. The air cells created during mixing and bulk fermentation expand inside the gluten network that bulk fermentation built.
Why this matters:
If bulk fermentation is too short, gluten and flavor are underdeveloped, and final proof can’t fix that. If final proof is too short, the loaf bakes dense even with perfect bulk. If either is too long, the dough overproofs and collapses.
Both rises are necessary and they can’t substitute for each other.
The clearest example I’ve seen: I baked the same recipe twice, both with proper final proof timing. The first time, I cut bulk short because I was running out of time. The bread was dense with tight crumb, not because final proof was wrong, but because bulk hadn’t built enough gluten or flavor. The second time, with proper bulk, the same final proof timing produced beautiful open crumb. Final proof can only inflate what bulk created.
How Long Final Proof Should Take
Timing by method and temperature
Final proof time varies dramatically based on temperature and dough type. The clock is even less reliable here than during bulk because final proof windows are narrower, and overproofing can happen quickly.
Sourdough at room temperature (72-75°F):
- Typical: 1-3 hours
- Pre-shaped to shaped: 30-45 min before final proof starts
- Watch for: slight puff, soft texture, slow-springing poke test
- Risk: overproofing happens fast above 78°F
Sourdough cold retard (38-40°F fridge):
- Typical: 8-16 hours, sometimes up to 24
- Place shaped dough in banneton, cover, refrigerate immediately after shaping
- Bake straight from fridge; don’t bring to room temp
- Risk: lower than room temperature proofing, but not zero because fermentation continues slowly
Commercial yeast bread (with active dry or instant yeast):
- Typical: 45-90 minutes at room temperature
- Faster fermentation = narrower window
- Watch carefully; yeast bread can overproof in 15-20 minutes if temperature is high
Pizza dough at room temperature:
- Typical: 30-90 minutes after balling
- Most pizza recipes use cold retard for the bulk and only short final proof for individual balls
Pizza dough cold retard:
- 24-72 hours in the fridge
- Take dough balls out 1-2 hours before stretching
- The flexibility of cold retard is why most modern pizza recipes use it
For most home bakers, cold retard final proof is more forgiving than room-temperature proof. The window between “ready to bake” and “overproofed” is hours instead of minutes. Especially helpful when your schedule isn’t perfectly predictable.
The Poke Test: Reading Final Proof
A quick technique for reading room-temperature dough
The poke test is one of the best tools for reading room-temperature final proof. It takes 5 seconds and gives you a quick read on where the dough is in fermentation.
How to do it:
- Lightly flour your index finger
- Press gently into the side of the dough about 1/2 inch deep
- Pull your finger back and watch the indent
Reading the result:
| Result | What It Means | Action |
|---|---|---|
| Springs back immediately and completely | Underproofed | Wait 30-60 minutes more |
| Springs back slowly, indent partially fills in 5-10 seconds | Properly proofed | Bake now |
| Indent stays, no spring back at all | Overproofed | Bake immediately or repurpose |
Why it works:
When you press the dough, you compress gas pockets temporarily. If gluten is strong but there’s not much gas yet (underproofed), it bounces back fast. If there’s a healthy balance (perfect), it springs back slowly. If gluten has weakened from too much fermentation (overproofed), it can’t push back, so the indent stays.
Where to poke:
For dough in a banneton (where it’s seam-up), poke the side that’s exposed. For dough on a counter, poke the top gently, away from the very center. Avoid poking deep; 1/2 inch is plenty.
Cold dough caveat:
The poke test is less reliable after a fridge proof because cold dough is firmer and often springs back faster than warm dough. With cold-retarded sourdough, judge the whole picture: how far bulk went, fridge temperature, total cold time, dough shape, visible puff, and how the dough feels when handled.
For more troubleshooting on dense loaves, see the dense sourdough guide.
Time Your Bakes Without Guesswork
The clock lies during fermentation. Track temperature, time, and result side by side until you see your kitchen’s pattern. This is the kind of repeatable record I built into the Flourwise baking app: step-by-step bake sessions, active timers, notes, photos, and a journal for comparing each loaf.
What Flourwise gives you for proofing:
- Step-by-step baking mode with timers for each fermentation stage
- Built-in journal: log every bake with a photo of the crumb
- Recipe calculator handles baker’s percentage so dough math is right before fermentation begins
Most proofing problems aren’t visible in a single bake. They’re patterns you only spot across several. The journal is what shows them.
Cold Retard: The Forgiving Method
Why most modern bakers cold-proof their dough
Cold retard means placing shaped dough in the fridge instead of proofing at room temperature. It’s slower, but it’s the most forgiving method available, and it usually produces better bread.
How cold retard works:
After shaping, place the dough (in its banneton or container) directly into the fridge at 38-40°F (3-4°C). The cold dramatically slows yeast activity, but doesn’t stop it. Over 8-16 hours, the dough rises gradually while developing flavor.
Why it’s better:
- Wide proofing window: Cold dough often gives you a practical window measured in hours, not minutes. The exact window depends on your starter strength, dough temperature, fridge temperature, and how far bulk fermentation went.
- Better flavor: Long cold fermentation lets enzymes break down starches into sugars, deepening flavor. Cold-retarded sourdough is noticeably more complex than room-temperature-proofed sourdough.
- Easier scoring: Cold dough is firm and easier to score with deep, clean cuts. Warm proofed dough is sticky and tears easily.
- Schedule flexibility: Mix dough in the morning, shape in the evening, refrigerate, bake the next morning. Or any other split that fits your life.
The cold retard schedule for sourdough:
- Mix dough at 8am
- Bulk fermentation 8am - 2pm (with stretch-and-folds 8:30 - 10:30)
- Pre-shape 2:00pm, bench rest 20 min
- Final shape 2:30pm
- Refrigerate 2:30pm
- Bake any time between 10:30pm that night and 6:30am the next morning (8-16 hours later)
Bake straight from cold:
Don’t bring the dough back to room temperature before baking unless your specific recipe tells you to. Cold dough scores cleanly and holds shape better in the oven.
If you struggle with timing during final proof, switch to cold retard. The fridge gives you a window measured in hours instead of minutes. Most sourdough bakers who try it keep it as their default schedule.
Common Proofing Mistakes
The errors that cause flat or dense bread
Mistake 1: Treating bulk and final proof as the same thing
Recipes that say “let the dough rise until doubled” can mean either stage, and treating them as identical leads to overproofing. Read carefully: bulk often targets a partial rise in sourdough, while final proof targets a visible puff rather than another full double.
Mistake 2: Proofing by clock, not by feel
Final proof times in recipes assume specific kitchen temperatures. If your kitchen is 5°F different from the recipe writer’s, your timing is off. Use the poke test, not the timer.
Mistake 3: Underproofing because you can’t wait
If your dough fails the poke test (springs back too fast), it’s not ready. Don’t bake hoping it’ll spring in the oven; underproofed dough produces dense, gummy bread. Wait 30-60 more minutes.
Mistake 4: Not using cold retard when you should
If your timing is uncertain, cold retard turns a tight final proof window into a wide one. Especially useful for new bakers still learning to read dough.
Mistake 5: Proofing in a too-warm spot
“Warm spot” advice means 75-78°F, not 90°F. Above 80°F, fermentation gets unpredictable and overproofing happens fast. Most kitchen counters are fine.
Mistake 6: Proofing without humidity control
Uncovered dough develops a dry skin during final proof, which can limit oven spring. Use a fitted cover, reusable plastic bag, lidded container, or humid proofing setup. A loose dry towel on its own can let the surface dry out.
Setting Up a Proofing Environment
Practical solutions for any kitchen
You don’t need a proofing box. Most kitchens have spots that work fine for final proof; you just need to know where.
Best room-temperature proofing spots:
- Top of the refrigerator (slightly warm from heat exhaust)
- Near a sunny window in winter (morning sun)
- Inside the oven with only the oven light on, if a thermometer confirms it stays in a safe proofing range
- Near a baseboard heater (not on it)
- In a microwave with a cup of hot water (steam adds humidity)
DIY proof box:
Fill a cooler or large plastic storage container with a bowl of hot water. Close the lid. The hot water slowly releases steam and warmth, creating a 75-80°F humidified environment. Replace water when it cools (usually every 1-2 hours).
For cold retard:
- Standard kitchen fridge at 38-40°F (3-4°C) works fine
- The bottom shelf is usually slightly warmer (39-41°F), which means slightly faster proofing
- Top shelf or rear of the fridge is colder (35-37°F), which means slower proofing
- Don’t use a wine fridge or beverage cooler; they are usually too warm for proper retard
Cover the dough:
- Banneton inside a reusable plastic bag
- Plastic wrap over the banneton or lightly over the dough surface
- A lidded dough container for bulk or pan loaves
- A second bowl inverted over the dough
The goal: prevent skin formation without trapping so much condensation that the surface turns wet and sticky.
Conclusion: Two Rises, Two Different Jobs
Proofing is the rise of bread dough, but it’s not one thing, it’s two. Bulk fermentation builds flavor and structure across the whole dough. Final proof inflates the shaped loaf and expands the gas cells that become your crumb. Treating them as the same step is the single biggest source of overproofing mistakes.
For many sourdough bakes, a reliable workflow is: bulk until the dough shows a clear partial rise and good strength, shape, cold retard 8-16 hours, bake straight from the fridge. This combination is forgiving, produces excellent flavor, and fits many home schedules.
For your next bake: separate the two rises in your head. Bulk is about building. Final proof is about inflating what was built. Read bulk by volume, strength, bubbles, and feel; read room-temperature final proof with the poke test and visual cues.
Quick Reference
- Proofing = the rise of bread dough from yeast fermentation. Two stages: bulk (first) and final proof (second)
- Bulk fermentation: before shaping, often 4-8 hours at room temp for sourdough, with timing driven by dough temperature and starter strength
- Final proof: after shaping, 1-3 hours room temp OR 8-16 hours cold retard
- Poke test: fast spring back = underproofed, slow spring back = ready, no spring back = overproofed
- Cold retard (fridge final proof) is the most forgiving method because it gives a wider proofing window
- Bake cold-retarded dough directly from the fridge; don’t warm to room temp first
- Cover the dough during proof to prevent skin formation
- Watch the dough, not the clock; every kitchen and every batch is different
- Final proof has a narrower timing window, but overproofing can start during bulk too
- For consistent results, use cold retard whenever timing flexibility matters
Frequently Asked Questions
What is proofing in baking?
Proofing is the rise of bread dough caused by yeast fermentation. There are two distinct stages: bulk fermentation (the first rise, before shaping, where the dough rises as a single mass) and final proof (the second rise, after shaping, where the shaped loaf rises in its final form). Both stages let yeast produce CO2 that gets trapped by the gluten network. Bulk fermentation builds flavor and structure across the whole dough; final proof expands the gas cells that become your final crumb. Most recipes use ‘proofing’ to mean final proof specifically, but technically both rises are proofing.
Is proofing the same as rising?
Proofing is a type of rising, but bakers often use the words differently. Rising is the broad term for dough expanding as yeast ferments. Proofing usually means the controlled rise of dough, especially the final rise after shaping and before baking. If a recipe says first rise or bulk fermentation, it means the dough rises before shaping. If it says final proof or second rise, it means the shaped loaf rises before baking.
What is the difference between bulk fermentation and proofing?
Bulk fermentation is the first rise, before shaping: the dough ferments as one mass in a container. Final proof is the second rise, after shaping: the shaped dough rises in its final form, often in a banneton or loaf pan. Bulk usually takes 4-8 hours at room temperature and often aims for roughly 50-75% volume increase in sourdough, depending on flour strength and dough temperature. Final proof usually takes 1-3 hours at room temperature or 8-16 hours in the fridge (cold retard). Both are technically proofing, but most bakers use the word ‘proofing’ to mean final proof specifically. Bulk builds gluten and flavor; final proof expands the crumb structure you see when you cut the loaf.
How long should bread proof?
Final proof time depends on temperature, dough type, and method. Room temperature final proof for sourdough is typically 1-3 hours at 72-75°F (22-24°C). Cold retard in the fridge (38-40°F / 3-4°C) is 8-16 hours, sometimes up to 24. Commercial yeast bread proofs faster, usually 45-90 minutes at room temperature. The timing is less important than the visual cues: dough should look puffy and slightly increased in volume, the surface should be smooth, and the poke test should show a slow spring back that doesn’t fully fill the indent. For cold-proofed dough, the poke test is less reliable because cold gluten springs back differently.
How do I know when my dough is done proofing?
Use the poke test: lightly flour your finger and gently press into the dough about 1/2 inch deep. If the indent springs back fast and completely, the dough needs more time. If it springs back slowly and the indent stays partially visible (filling in over 5-10 seconds), the dough is properly proofed and ready to bake. If the indent doesn’t spring back at all, the dough is overproofed. Combine this with visual signs: properly proofed dough has a soft, jiggly feel, gentle dome, and slight bubbles visible on the surface.
Can you over-proof bread?
Yes, and overproofing is a common mistake. When dough proofs too long, the gluten network weakens and can no longer hold gas well, so the dough collapses. The bread bakes flat with tiny uniform crumb instead of an open structure. Signs of overproofing include: poke test indent stays permanent, dough surface looks deflated or wrinkly, dough is sticky and slack and won’t hold its shape. To prevent overproofing, watch the dough rather than the clock, use a cold retard for forgiving timing windows, and stop final proof when the poke test shows a slow spring back, not when the dough has fully doubled.