Why Is My Sourdough Dense? 7 Causes + Fixes
⚡ What You’ll Learn in 60 Seconds
- #1 cause: Weak or immature starter – if it doesn’t double in 4-8 hours after a proper feeding (1:5:5 ratio), it can’t leaven bread properly
- #2 cause: Underproofing – dough needs enough volume increase during bulk (depends on flour protein – roughly 50-75% for standard bread flour)
- #3 cause: Overproofing – gluten breaks down from too much acid and enzyme activity, gas escapes
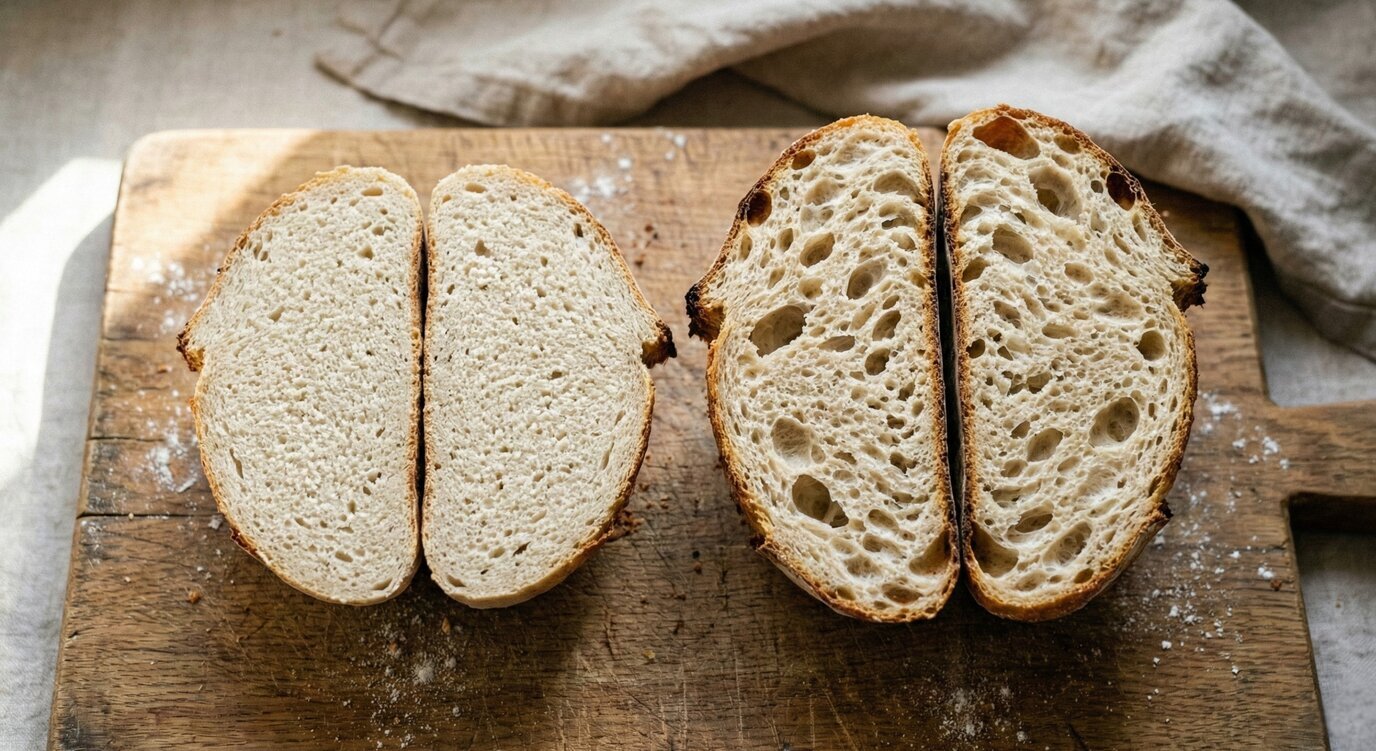
- Quick diagnostic: Cut your loaf and look at the crumb – large random holes with gummy/dense patches = underproofed, tiny uniform crumb with flat shape = overproofed
- Key insight: Dense bread always has a specific, fixable cause – once you identify it, the fix is usually straightforward
↓ Full 14-min guide with 7 causes, diagnostic methods, and exact fixes for each
Dense sourdough has a cause, and it’s almost always identifiable. The crumb pattern, the shape, the crust color, and even the taste tell you exactly what went wrong. Once you learn to read these signals, every dense loaf becomes a diagnostic tool that makes your next bake better.
I baked my first sourdough loaf at 65% hydration with a two-week-old starter. The crumb was tight and dense – not terrible, but nowhere near the open crumb I’d seen in photos. The recipe said “4 hours bulk fermentation,” but my kitchen was 65°F. The dough needed closer to 8 hours at that temperature.
My next bake, I extended fermentation and used the starter at peak instead of pulling it straight from the fridge. The difference was immediate – visible air pockets, lighter texture, better oven spring. Same recipe, same flour. Two variables changed.
That’s when the pattern clicked: dense sourdough always traces back to a specific, identifiable cause. Once you know what to look for, the fix is usually one adjustment away.
After baking sourdough for over 3 years, I’ve diagnosed every type of dense loaf – and deliberately recreated each one to understand the mechanics. This guide covers the seven most common causes, how to read the clues your loaf gives you, and the exact fix for each.
Every dense sourdough loaf is telling you something specific. The crumb structure, the shape, the oven spring – they’re all diagnostic clues. Learn to read them, and dense bread becomes a problem you solve once, not a mystery you keep repeating.
How to Diagnose Dense Sourdough
Reading the clues your loaf gives you
Before you fix the problem, you need to identify it. Your dense loaf contains diagnostic information in four areas:
1. Crumb Pattern (Most Important)
Cut your loaf through the center. The distribution of holes tells you what happened:
- Large random holes with gummy or dense patches between them: Underproofing or weak starter – the few gas pockets that formed expanded wildly in the oven, but the rest of the dough didn’t ferment enough to develop proper structure. You might see what looks like an impressive ear and big holes, but this is actually a “fool’s crumb” – it looks open but the dough between the holes is dense and gummy
- Tiny uniform holes throughout, flat shape: Overproofing – gluten broke down from too much acid and enzyme activity, so gas couldn’t stay trapped in larger pockets. Everything deflated into a flat, dense loaf with very small, even crumb
- Dense with some medium holes scattered randomly: Insufficient gluten development – structure couldn’t trap gas evenly
- Uniformly tight but not gummy: Low hydration – crumb is tight by design, not from fermentation failure
2. Loaf Shape
- Flat, spread sideways: Overproofing, weak gluten, or shaping without enough tension
- Tall but dense inside with gummy patches: Underproofing – structure held but fermentation didn’t distribute gas evenly through the dough
- Normal shape but heavy: Low hydration or insufficient fermentation
3. Oven Spring
- No oven spring at all: Overproofed, dead starter, or oven too cold
- Some spring but loaf is still dense: Underproofed or weak gluten
- Large air pockets clustered near the crust, rest is dense: Oven (or Dutch oven) was too hot – the crust formed too fast, trapping expanding gas into a few big bubbles near the surface while the interior stayed dense
- Good spring but dense bottom: Oven temperature too high on bottom (heat from below)
4. Crust and Taste
- Pale crust, doughy taste: Underproofed – sugars weren’t consumed, Maillard reaction limited
- Dark crust, very sour taste: Overproofed – excess acid development
- Normal crust, just dense: Likely a gluten, hydration, or shaping issue
The crumb pattern is your best diagnostic tool. Take a photo of every loaf you cut open and compare them over time. After 5-6 bakes with notes, you’ll start recognizing patterns instantly.
Reason 1: Weak or Immature Starter
The most common cause of dense sourdough
If your starter can’t leaven bread, nothing else matters. This is the #1 cause of dense sourdough, especially for new bakers.
What Happens
Sourdough starter is a culture of yeast and bacteria. The yeast produces CO2 gas that makes bread rise. If the yeast population is weak, underfed, or dormant, it won’t produce enough gas to create an open crumb. You get dense, heavy bread.
Signs This Is Your Problem
- Starter doesn’t double in height within 4-8 hours after feeding
- Starter doesn’t have visible bubbles on the surface and sides of the jar
- Starter smells like flour or has no aroma (a ready starter smells pleasantly tangy, like yogurt)
- Starter is less than 2 weeks old
- You used starter straight from the fridge without refreshing
- Dough barely rose during bulk fermentation (less than 25-30% increase)
The Fix
For immature starter (less than 2 weeks old):
- During the first few days, a 1:1:1 ratio (equal parts old starter, flour, water) is fine to get things going
- Once you see activity (around day 5-7), switch to 1:5:5 – that’s 1 part starter, 5 parts flour, 5 parts water
- Don’t attempt bread until starter consistently doubles in 4-8 hours
- Use whole wheat or rye flour in feedings (more wild yeast and bacteria = faster maturation)
For established starter that seems weak:
- Feed 2-3 times at room temperature before using for bread
- Use a 1:5:5 ratio (e.g. 10g starter, 50g flour, 50g water) – this gives the microorganisms fresh food and room to grow. A higher ratio like 1:10:10 works great if the starter hasn’t been fed in a while
- Wait for peak: doubled in size, bubbly surface, pleasant tangy aroma
- Check that you’re using unchlorinated water (chlorine can weaken cultures – filtered water, bottled spring water, or just leave tap water out overnight)
- Ensure kitchen temperature is 68-78°F (cold kitchens slow fermentation dramatically)
For refrigerated starter:
- Take out 12-24 hours before baking
- Feed at room temperature and wait for full peak activity
- Ideally, do 2 feedings before using – the second rise is usually more vigorous
For my first 5-6 loaves, I was using my starter at 3-4 hours after feeding – before it hit peak. It looked active (some bubbles) but hadn’t doubled yet. The dough would ferment slowly and produce dense bread. Once I started waiting for true peak (doubled height, domed top, 5-6 hours at 72°F), the difference was dramatic. Same recipe, same flour – just a stronger starter at the right moment.
Reason 2: Underproofing
Not enough fermentation time
After weak starter, underproofing is the second most common cause of dense sourdough. Even with a strong starter, the dough needs enough time (and warmth) to ferment properly.
What Happens
During bulk fermentation, yeast consumes sugars in the flour and produces CO2 gas. This gas gets trapped by the gluten network, creating the air pockets that become your crumb. If fermentation is cut short, not enough gas is produced, and the bread comes out dense.
Signs This Is Your Problem
- Crumb has a few oversized holes (craters) surrounded by dense, gummy dough – this is not the same as an open crumb; the big pockets formed because water turned to steam in underfermented dough and blew out random cavities
- Parts of the crumb look wet, raw, or gummy – especially toward the bottom. The starch didn’t fully gelatinize because the air pockets weren’t there to transfer heat evenly
- You might see a dramatic ear on the crust – looks impressive, but with a gummy interior it’s actually a classic sign of underproofing (sometimes called “fool’s crumb”)
- Bread feels heavy for its size
- Dough didn’t increase enough during bulk fermentation
The Fix
Extend bulk fermentation:
How much volume increase you’re looking for depends on your flour. With standard bread flour (11-13% protein), aim for about 50-75%. With weaker all-purpose or whole grain flour (8-10% protein), even 25-50% might be enough – push further and the gluten starts giving out. With strong bread flour (14%+), you can safely go to 75-100%. Use volume increase as your primary gauge, not time.
Temperature matters more than time:
- At 75°F: bulk fermentation typically takes 4-6 hours
- At 70°F: expect 6-8 hours
- At 65°F: might need 8-12 hours
- At 80°F: could be done in 3-4 hours
How to judge volume increase:
- Use a clear container with straight sides for bulk fermentation
- Mark the starting level with a rubber band or tape
- Check periodically – when you hit your target increase (see above), bulk is done
- The dough should look bubbly on the surface and feel airy, jiggly when you tilt the container
Pro tip – the aliquot jar: Take a small piece of dough right after mixing and put it in a tiny jar (a shot glass works). Mark the level. This little sample ferments at the same rate as your main dough, but it’s much easier to see the exact volume increase through the glass. Just make sure it stays at the same temperature as your dough
My biggest underproofing breakthrough: I switched from a mixing bowl to a clear, straight-sided container for bulk fermentation. Suddenly I could actually see how much the dough had risen. In a round bowl, the dough rises vertically and horizontally – it’s nearly impossible to gauge volume increase accurately. A square container with a rubber band at the starting level made underproofing basically impossible.
Don’t confuse bulk fermentation with final proof. Bulk fermentation is the first rise (in a container, before shaping). Final proof is the second rise (after shaping, often in a banneton). Both affect density, but bulk fermentation is where most of the gas production happens.
Reason 3: Overproofing
Fermented too long – structure collapsed
Overproofing is the opposite problem but produces a similar result: dense bread. It’s trickier to diagnose because overproofed dough can look very active right before it collapses.
What Happens
When dough ferments too long, two things break down the gluten network simultaneously:
- Enzymes eat the gluten: From the moment flour touches water, protease enzymes start converting gluten proteins into amino acids. During normal fermentation this is minimal, but if you let it go too long, the enzymes break down enough gluten that the structure collapses. The bacteria in your starter also directly consume gluten as food – so the longer fermentation runs, the less gluten remains.
- Gas has nowhere to go: Without a strong gluten network, CO2 can’t stay trapped in larger pockets. The gas disperses into tiny bubbles or escapes entirely.
The result: dough that was once smooth and elastic becomes sticky, slack, and tears easily. When baked, it can’t hold its shape – you get a flat, dense loaf with tiny uniform crumb instead of an open structure.
Signs This Is Your Problem
- Crumb has tiny, uniform holes throughout – looks very even but flat and dense. The gluten network broke down, so gas couldn’t stay in larger pockets and dispersed into many small ones
- Loaf is flat and spread out like a pancake (no oven spring)
- Dough felt very sticky, slack, and almost liquid-like after bulk – it might have been hard to even pour it out of the container
- Dough didn’t hold its shape during shaping – it slumped immediately or stuck to everything
- Taste is noticeably sour, maybe with a sharp tangy bite
- Poking the dough left a permanent indent (didn’t spring back at all)
- When you tried to shape it, the dough tore easily instead of stretching
The Fix
Shorten fermentation time:
- If bulk fermentation goes too long, reduce time by 30-60 minutes
- Use volume increase as your guide – for typical bread flour, don’t go beyond 75-100%. For weaker flours, even less
- In warm kitchens (above 78°F), watch carefully – overproofing happens fast
- If the dough suddenly gets sticky after being smooth, that’s a red flag – the gluten is starting to break down
Use the poke test for final proof:
- Press a floured finger into the dough about 1 inch deep
- Underproofed: Dough springs back quickly and completely
- Properly proofed: Dough springs back slowly but doesn’t fully refill the indent
- Overproofed: Dough stays indented, doesn’t spring back at all
Cold retard for control:
- After shaping, place the dough in the fridge (38-40°F) for 8-16 hours
- Cold dramatically slows fermentation, giving you a wider window
- Bake directly from cold – no need to bring back to room temperature
- This is the most forgiving method for timing
My first warm-weather bakes taught me this fast. My kitchen hit 80°F, and recipes written for 70°F kitchens gave fermentation times that were way too long – dough would look perfect at 4 hours, then collapse by hour 6. Once I started checking ambient temperature and adjusting times accordingly, overproofing stopped being an issue.
Reason 4: Low Hydration
Not enough water for open crumb
Low hydration isn’t always a problem – some breads are designed to be dense and tight-crumbed. But if you’re expecting airy, open sourdough and getting tight crumb, hydration might be the issue.
What Happens
Water serves multiple functions in bread dough:
- Enables gluten development: Flour proteins need water to form gluten
- Creates steam during baking: Steam expands, creating larger air pockets
- Affects crumb structure: More water = more open, irregular crumb
At 60-65% hydration, sourdough naturally produces a tighter crumb. This isn’t a defect – it’s the characteristic of that hydration level. But if you want open crumb, you need 68%+ hydration.
Signs This Is Your Problem
- Crumb is uniformly tight but not gummy
- Dough felt stiff and easy to shape (not sticky at all)
- Bread tastes good and has proper flavor – just dense texture
- Fermentation seemed normal (dough rose, looked active)
- You’re using a recipe below 68% hydration
The Fix
Increase hydration gradually:
- If you’re at 60-65%, try increasing to 68-70%
- Add 3-5% more water (for 1000g flour, that’s 30-50g more water)
- Don’t jump straight to 75%+ unless you’re comfortable handling wet dough
Hydration and crumb expectations:
| Hydration | Typical Crumb | Handling |
|---|---|---|
| 60-65% | Tight, uniform, sandwich-style | Easy, not sticky |
| 68-72% | Moderate openness, some irregular holes | Manageable, slightly tacky |
| 73-78% | Open, irregular, artisan-style | Sticky, requires technique |
| 80%+ | Very open, ciabatta-style large holes | Very sticky, advanced skill |
Don’t forget starter water:
Your sourdough starter contributes water to the dough. If you use 200g of 100% hydration starter, that’s 100g flour and 100g water. Factor this into your total hydration calculation. Many new bakers underestimate their actual hydration because they forget to count the water in their starter.
I started at 65% hydration because the dough was easier to handle. The bread was good but always had a tight crumb. Moving to 70% opened up the crumb noticeably – stickier dough, but handling became natural after a few bakes. The improvement in crumb structure was worth the adjustment.
Calculate Hydration Automatically
Flourwise handles baker’s percentage and hydration calculations so you can focus on technique.
Stop doing math, start baking better:
- Enter ingredients → see real hydration percentage instantly
- Account for starter water content automatically
- Scale recipes up or down with one tap
- Track which hydration levels work best in your baking journal
Get the calculations right. Focus on what matters: technique and timing.
Reason 5: Poor Gluten Development
The structure can’t trap gas
Gluten is the protein network that traps CO2 gas produced by fermentation. Without adequate gluten development, gas escapes instead of creating air pockets in your crumb.
What Happens
When flour and water mix, two proteins (glutenin and gliadin) combine to form gluten. This network needs to be developed through kneading, folding, or time to become strong enough to trap gas. If gluten is underdeveloped, the dough can’t hold its structure – gas escapes, and the bread stays dense. Keep in mind that gluten also degrades over time – enzymes (protease) in the flour slowly break it down from the moment you mix. So the goal is to build enough structure before fermentation breaks it down.
Signs This Is Your Problem
- Dough tears easily instead of stretching
- Windowpane test fails (dough rips before becoming thin and translucent)
- Crumb has random dense patches mixed with some holes
- Dough was slack and extensible but not elastic
- You skipped stretch-and-folds or did very few
The Fix
Stretch-and-folds (recommended for sourdough):
- Perform 3-4 sets of stretch-and-folds during the first 2 hours of bulk fermentation
- Space them 30-45 minutes apart
- Each set: stretch one side of the dough up and fold it over, rotate 90°, repeat 4 times (one per side)
- Dough should feel noticeably tighter and more elastic after each set
Fermentolysis (better than autolyse for most sourdough):
- Instead of mixing flour and water alone and waiting (classic autolyse), just use less starter and let the whole dough ferment longer
- This gets you all the benefits of autolyse – gluten develops naturally over time – but with the added bonus that fermentation is already working from the start
- For example: instead of 20% starter with a 4-hour bulk, try 5-10% starter with an 8-12 hour bulk. The dough develops beautiful gluten without extra kneading steps
- Classic autolyse (flour + water, rest 30-60 min, then add starter) still works fine, especially for yeasted breads. But for sourdough, fermentolysis is simpler and gives more consistent results
Coil folds (for high hydration dough):
- Wet your hands, slide them under the center of the dough
- Lift the center while the edges fold underneath
- Rotate 90° and repeat
- Gentler than stretch-and-folds, works well above 75% hydration
The Windowpane Test
To check gluten development:
- Take a small piece of dough (golf ball size)
- Stretch it gently between your fingers
- If it stretches thin enough to see light through without tearing – gluten is developed
- If it tears before becoming translucent – needs more folding or time
Early on, I did only 2 sets of stretch-and-folds because the dough “felt developed.” It wasn’t – the crumb told me so. Switching to 4 consistent sets made a dramatic difference. The dough goes from slack and spreadable after mixing to smooth, elastic, and cohesive after the fourth set. You can feel the transformation in your hands.
Reason 6: Shaping Problems
Degassing too much or not enough surface tension
Shaping is the step between bulk fermentation and final proof. How you handle the dough here directly affects oven spring and final crumb structure.
What Happens
During shaping, you create surface tension – a tight outer “skin” that holds the dough’s shape during final proof and baking. If you shape too aggressively, you press out all the gas bubbles built during fermentation. If you shape too gently, the dough spreads flat without enough tension.
Signs This Is Your Problem
- Crumb is dense but dough seemed well-fermented during bulk
- Loaf spread sideways instead of rising upward during bake
- You kneaded or pressed the dough flat during shaping
- Dough felt slack and loose going into the oven
The Fix
Pre-shape gently:
- Turn dough out onto a lightly floured surface
- Use a bench scraper to fold it into a rough round (don’t knead or press)
- Let it rest 15-20 minutes to relax gluten
- This bench rest makes final shaping easier and gentler
Final shape with tension, not force:
- Flip the pre-shaped dough smooth-side down
- Fold the edges toward the center (letter fold or batard technique)
- Flip seam-side down and use the bench scraper to drag it toward you on the counter, creating tension on the surface
- The surface should look smooth and taut, not torn
The balance:
- Too aggressive = degassed (pressed out bubbles, dense bread)
- Too gentle = no tension (flat loaf, spreads sideways)
- Target: move the dough without pressing on it, create tension with dragging, not squeezing
The key technique that clicked for me: using the bench scraper to build tension. Instead of pressing the dough with my hands (which degasses it), cup the dough with the bench scraper and your hand, then drag it across the countertop. The friction creates surface tension without compressing the interior. Oven spring improves noticeably.
Reason 7: Oven Issues
Temperature, steam, and baking surface problems
Even perfectly proofed dough can produce dense bread if the oven environment isn’t right. Temperature and steam are critical for oven spring – the final expansion that transforms your dough into an airy loaf.
What Happens
When dough enters a hot oven, three things should happen quickly:
- Oven spring: Heat causes trapped gas to expand and yeast to produce a final burst of CO2 (yeast dies around 140°F, but gas expands as it heats). This can increase loaf volume by 20-30%.
- Steam keeps the crust soft: Steam condenses on the dough surface and keeps it at around 212°F (100°C) – below the temperature where crust forms and hardens. This means the dough stays flexible and can keep expanding. Without steam, the surface jumps straight to browning temperatures (the Maillard reaction kicks in around 284°F / 140°C), the crust locks in place, and expansion stops. You want your dough to stay in this soft “gel stage” as long as possible.
- Internal structure sets: As the bread bakes, starches gelatinize and proteins coagulate, creating the permanent crumb structure.
If oven temperature is too low, the spring happens too slowly and the crust sets before full expansion. If there’s no steam, the crust hardens immediately and restricts rise.
Signs This Is Your Problem
- Dough seemed well-proofed but didn’t spring in the oven
- Crust is very thick and hard
- Bread has a “seam” where it tried to expand but the crust was already set
- Large air pockets clustered near the crust with dense crumb below – this means the Dutch oven was too hot, not too cold. The crust hardened fast and the gas that was trying to push outward merged into big bubbles right under the surface
- Bottom is very dark but top is pale (uneven heat)
- You baked without steam or without a Dutch oven
- Nice blisters are missing from the crust (too-hot bake often produces a smoother, less blistered surface)
The Fix
Use a Dutch oven (recommended):
- Preheat Dutch oven at 450°F (230°C) for at least 30 minutes
- Place dough inside, score it, spritz with a little water, cover with lid
- Bake covered for 25-30 minutes (steam from the dough is trapped inside)
- Remove lid, bake another 10-25 minutes until the crust reaches your preferred color
- Check internal temperature with a thermometer – bread is done at 205-210°F (96-99°C)
- This is the most reliable method for home bakers
If no Dutch oven – the inverted tray method:
- Place a baking stone (or a preheated tray) in the middle of the oven, and a heat-resistant bowl with rocks on the bottom rack
- Heat the oven to 450°F (230°C) for at least 30 minutes
- Load your dough onto the hot stone/tray, pour boiling water over the rocks, and place a second (cold) tray upside down over the bread
- The inverted tray traps steam around the bread – similar principle to a Dutch oven but you can bake multiple loaves at once
- After 30 minutes, remove the top tray and water bowl. Bake another 10-25 minutes for crust color
- This is more versatile than a Dutch oven and gives great results once you get the setup dialed in
Temperature – the Goldilocks zone:
Here’s something most people don’t realize: too hot is just as bad as too cold for oven spring. When your Dutch oven is preheated to 480-500°F (250-260°C) or higher, the crust forms so fast that the dough can’t expand upward. You end up with large air pockets trapped right under a thick crust, and a denser interior – the opposite of what you wanted. The sweet spot is around 450°F (230°C).
- Preheat at 450°F (230°C) for at least 30 minutes – hot enough for good spring, not so hot that the crust locks too early
- Don’t just trust your oven display – actual temperature can easily be 40-50°F off from what the dial says. An oven thermometer is essential. Even small changes to your setup (like adding or removing a baking stone) can dramatically change how fast the oven reaches temperature
- Don’t go above 480°F (250°C) for Dutch oven baking – the crust sets before the bread has time to spring
- Turn off the fan if you can (convection vents steam out of the oven). If you can’t turn off the fan, use a Dutch oven
- If your oven runs cold, bump up the setting – but verify with a thermometer, don’t guess
For me, getting steam right was the single biggest upgrade. Whether you use a Dutch oven, an inverted tray, or a baking stone with lava rocks and boiling water – all of these work well once you dial them in. A Dutch oven is the easiest to get consistent results with, but it’s not the only way. Plenty of bakers get amazing oven spring on a stone with a good steam setup.
The other game-changer: an oven thermometer. I was preheating to what I thought was 230°C, but it was actually closer to 260°C. The crust was forming too fast, and I kept getting big air pockets right under the surface with a denser interior. Once I started baking at a verified 230°C, the oven spring improved dramatically – same dough, same recipe, just a lower temperature. It’s counterintuitive, but hotter isn’t always better.
Quick Diagnostic Chart
Identify your problem at a glance
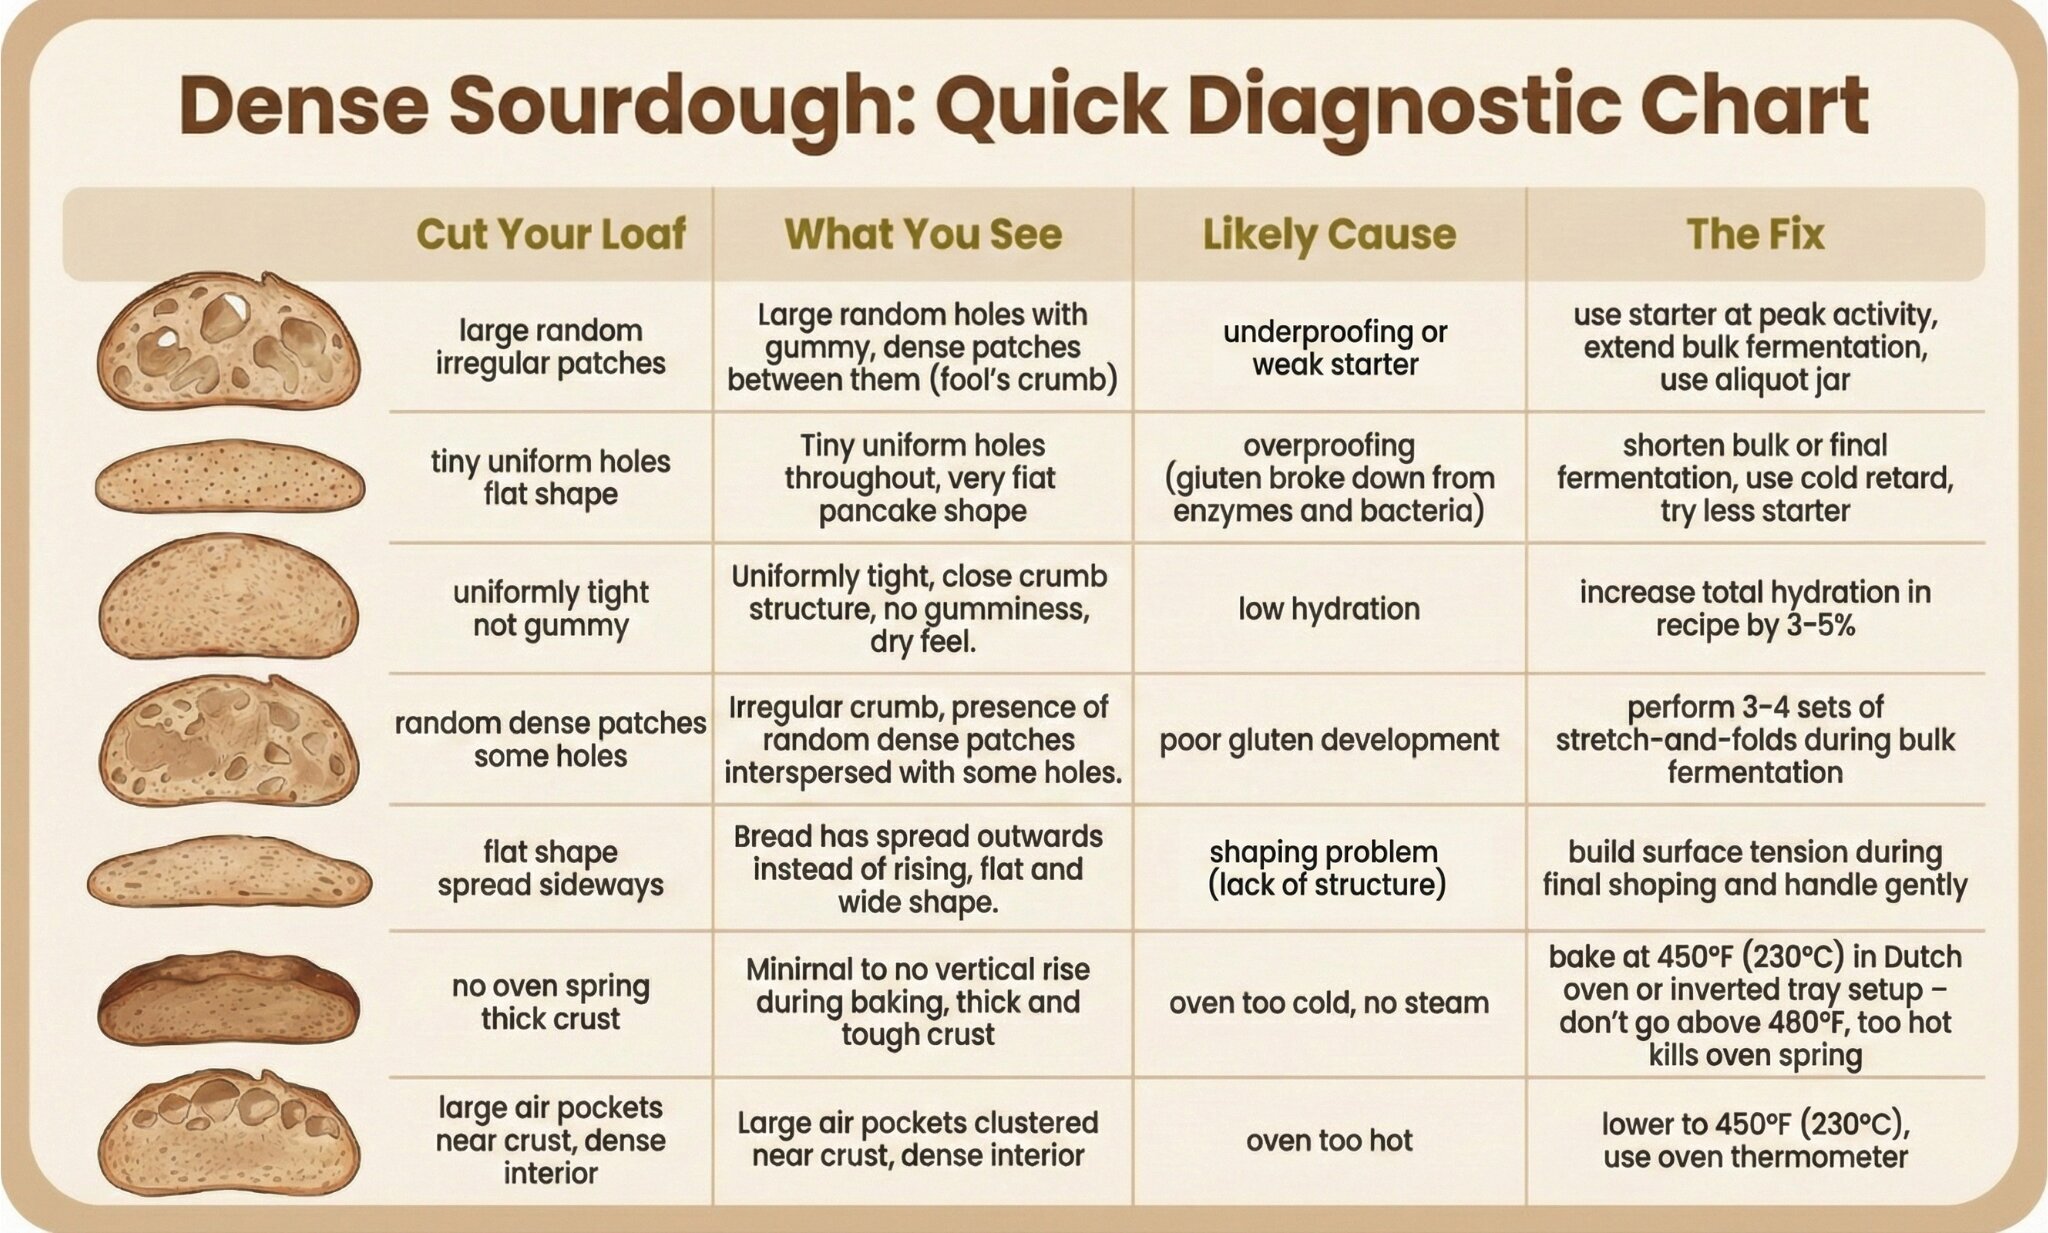
| Symptom | Likely Cause | Fix |
|---|---|---|
| Large random holes + gummy dense patches | Underproofing (fool’s crumb) | Extend bulk fermentation, use aliquot jar |
| Tiny uniform holes, flat pancake shape | Overproofing | Shorten fermentation, use cold retard, try less starter |
| Uniformly tight but not gummy | Low hydration | Increase hydration by 3-5% |
| Random dense patches, some holes | Poor gluten | More stretch-and-folds (3-4 sets) or try fermentolysis |
| Flat shape, spread sideways | Shaping or overproofing | Pre-shape, build surface tension |
| No oven spring, thick crust | Oven too cold or no steam | Dutch oven or inverted tray at 450°F, preheated 30+ min |
| Large bubbles near crust, dense inside | Oven/Dutch oven too hot | Lower temp to 450°F (230°C), use oven thermometer |
| Dense + gummy center | Underproofing + underbaking | Extend fermentation + bake longer (internal temp 205-210°F) |
Most dense sourdough comes from just two causes: weak starter and underproofing. Fix those first. If your starter reliably doubles in 4-8 hours after a 1:5:5 feeding, and your dough hits the right volume increase for your flour during bulk fermentation, you’ve eliminated the two most common problems. Everything else is refinement.
Preventing Dense Bread: A Process Checklist
Follow this for consistent results
After 3 years of baking and helping others troubleshoot their loaves, I’ve found that following a consistent process eliminates most issues. Here’s the checklist I use for every bake:
Pre-Bake Verification
-
Starter check: Has it doubled in the last 4-8 hours? Is it bubbly, domed, and smells pleasantly tangy? If not – feed (1:5:5 ratio) and wait for peak.
-
Temperature check: What’s your kitchen temperature? Adjust expected fermentation times:
- Below 68°F: add 2-3 hours to recipe times
- 68-75°F: follow recipe times
- Above 78°F: reduce times by 1-2 hours
-
Hydration target: Are you at 68%+ for open crumb? Have you accounted for water in your starter?
-
Bulk fermentation gauge: Use a clear container (or an aliquot jar). Mark starting level. Target volume increase based on your flour protein – roughly 50-75% for standard bread flour, less for weaker flours.
-
Gluten development: Plan 3-4 sets of stretch-and-folds in the first 1.5-2 hours of bulk.
-
Shape with intention: Pre-shape gently, bench rest 15-20 min, final shape with tension.
-
Oven prep: Preheat Dutch oven (or inverted tray setup) at 450°F (230°C) for at least 30 minutes before baking.
Keep a Baking Journal
The most effective way to prevent dense bread long-term is to track your bakes. For each loaf, note:
- Starter activity (hours since feeding, peak or not)
- Kitchen temperature
- Bulk fermentation time and volume increase
- Number of stretch-and-fold sets
- Final proof time and method (room temp vs cold retard)
- Oven temperature and steam method
- Result: crumb photo, density assessment, taste
After 5-6 bakes with notes, you’ll see patterns. Maybe your bulk fermentation is always too short. Maybe your oven runs cold. Maybe your starter needs a second feeding before bake day. The journal reveals the pattern; the fix becomes obvious.
I keep a simple spreadsheet for my bakes – just temperature, times, and a photo of the crumb. After a few weeks, one pattern stood out: all my best loaves had bulk fermentation of 6+ hours at 70-72°F. All the dense ones were under 5 hours. That single data point made my process consistent. I stopped watching the clock and started watching the dough – but I knew the minimum time needed.
Conclusion: Dense Bread Is a Diagnostic Tool
Dense sourdough isn’t a failure – it’s information. Every tight crumb, every flat loaf, every gummy center is telling you something specific about what happened during the process. Once you learn to read those signals, the fixes are usually straightforward.
Start with the two most common causes: make sure your starter is truly at peak when you use it (fed with a 1:5:5 ratio, doubled, bubbly, tangy aroma), and give your dough enough time to ferment for your specific flour. Those two adjustments alone fix the majority of dense bread issues.
For everything else – gluten development, shaping, oven setup – treat each bake as an experiment. Change one variable at a time. Take notes. Compare results. Within 5-6 deliberate bakes, you’ll have dialed in your process for your specific kitchen, flour, starter, and schedule.
Dense bread stops being frustrating when it starts being informative.
Quick Reference
- Weak starter is the #1 cause – use only when it doubles in 4-8 hours, is bubbly, and smells pleasantly tangy. Feed with 1:5:5 ratio (not 1:1:1)
- Underproofing is #2 – look for the right volume increase for your flour (50-75% for standard bread flour). Underproofed crumb has large random holes with gummy patches – don’t mistake big holes for good fermentation
- Overproofing shows as tiny uniform crumb, flat pancake shape, and sticky dough – shorten fermentation, use less starter, or use cold retard
- Hydration below 65% naturally produces tight crumb – increase to 68-70% for more open texture
- Gluten needs 3-4 sets of stretch-and-folds during first 2 hours of bulk. Or try fermentolysis: less starter, longer fermentation – gluten develops on its own
- Shape gently but with surface tension – don’t press out gas, don’t leave it slack
- Preheat Dutch oven or inverted tray setup at 450°F (230°C) for 30+ minutes – steam is critical for oven spring
- Use a clear container or aliquot jar to track volume increase during bulk fermentation
- Keep a baking journal – track temperature, times, and crumb photos to find patterns
- Change one variable at a time between bakes to isolate what works
Frequently Asked Questions
Why is my sourdough bread so dense and heavy?
Dense sourdough is usually caused by one of seven issues: weak or immature starter (not at peak when used), underproofing (not enough fermentation time), overproofing (fermented too long and structure collapsed), low hydration (not enough water), poor gluten development (insufficient kneading or folding), shaping problems (degassing too much or too little tension), or oven issues (wrong temperature or no steam). The most common cause is using starter that isn’t at peak activity. Check if your starter doubles in 4-8 hours after a 1:5:5 feeding, has visible bubbles, and smells pleasantly tangy before using it.
How do I fix dense sourdough bread?
Fix dense sourdough by identifying the specific cause: 1) Use starter at peak – doubled, bubbly, pleasant tangy aroma after a 1:5:5 feeding, 2) Extend bulk fermentation until dough reaches the right volume increase for your flour (about 50-75% for standard bread flour, less for weaker flours), 3) Increase hydration by 3-5% if dough feels stiff, 4) Perform 3-4 sets of stretch-and-folds during bulk, or try fermentolysis (less starter, longer fermentation) for natural gluten development, 5) Shape with enough tension without completely degassing, 6) Bake at 450°F (230°C) with steam for first 20-30 minutes. Track your process with notes to identify which variable needs adjusting.
Can underproofed sourdough be dense?
Yes, underproofing is one of the most common causes of dense sourdough. When dough hasn’t fermented long enough, the crumb typically shows large random holes surrounded by dense, gummy patches – sometimes called fool’s crumb. The big holes look impressive but they formed from water steam, not proper fermentation. Other signs: gummy or wet areas especially toward the bottom, heavy feel, possible raw or doughy flavor. Fix by extending bulk fermentation time, using an aliquot jar to track volume increase, or increasing temperature slightly.
Does hydration affect sourdough density?
Yes, hydration significantly affects density. Lower hydration (below 65%) produces tighter, denser crumb – which is normal for that hydration level. Higher hydration (70-80%) allows more open, airier crumb. If you want lighter bread, try increasing hydration by 3-5%. However, higher hydration requires better gluten development and handling skills. Start at 68-70% for a balance of open crumb and manageable dough.
How can I tell if my sourdough is overproofed or underproofed?
Underproofed sourdough: large random holes with gummy, dense patches between them (fool’s crumb), parts may look wet or underbaked, heavy feel, may have a dramatic ear that looks impressive but the inside tells the real story. Overproofed sourdough: tiny uniform crumb throughout, very flat pancake shape, poor oven spring, dough was very sticky and hard to shape, noticeably sour taste. The poke test helps during proofing: properly proofed dough springs back slowly but not completely when poked with a floured finger. Underproofed springs back fast, overproofed stays indented.
Is dense sourdough safe to eat?
Yes, dense sourdough is safe to eat as long as it’s fully baked. Dense bread is a texture issue, not a safety issue. The bread is still properly fermented and cooked – it just didn’t develop the open crumb structure. Check internal temperature with a thermometer: it should reach 205-210°F (96-99°C) in the center. If the center is gummy or doughy, bake longer rather than discarding – return it to the oven for 10-15 more minutes.
How long should sourdough bulk ferment?
Bulk fermentation time depends on temperature, starter strength, and flour protein – not a fixed number of hours. At 75°F with active starter, expect 4-6 hours. At 70°F, 6-8 hours. At 65°F, 8-12 hours. The best indicator is volume increase, but the target depends on your flour: about 50-75% for standard bread flour (11-13% protein), 25-50% for weaker flours, up to 100% for strong bread flour (14%+). Use a clear container or an aliquot jar to track volume. Don’t rely on time alone – temperature and flour strength make fixed times unreliable.