Sourdough Hydration Chart: Which Percentage for Which Bread?
⚡ What You’ll Learn in 60 Seconds
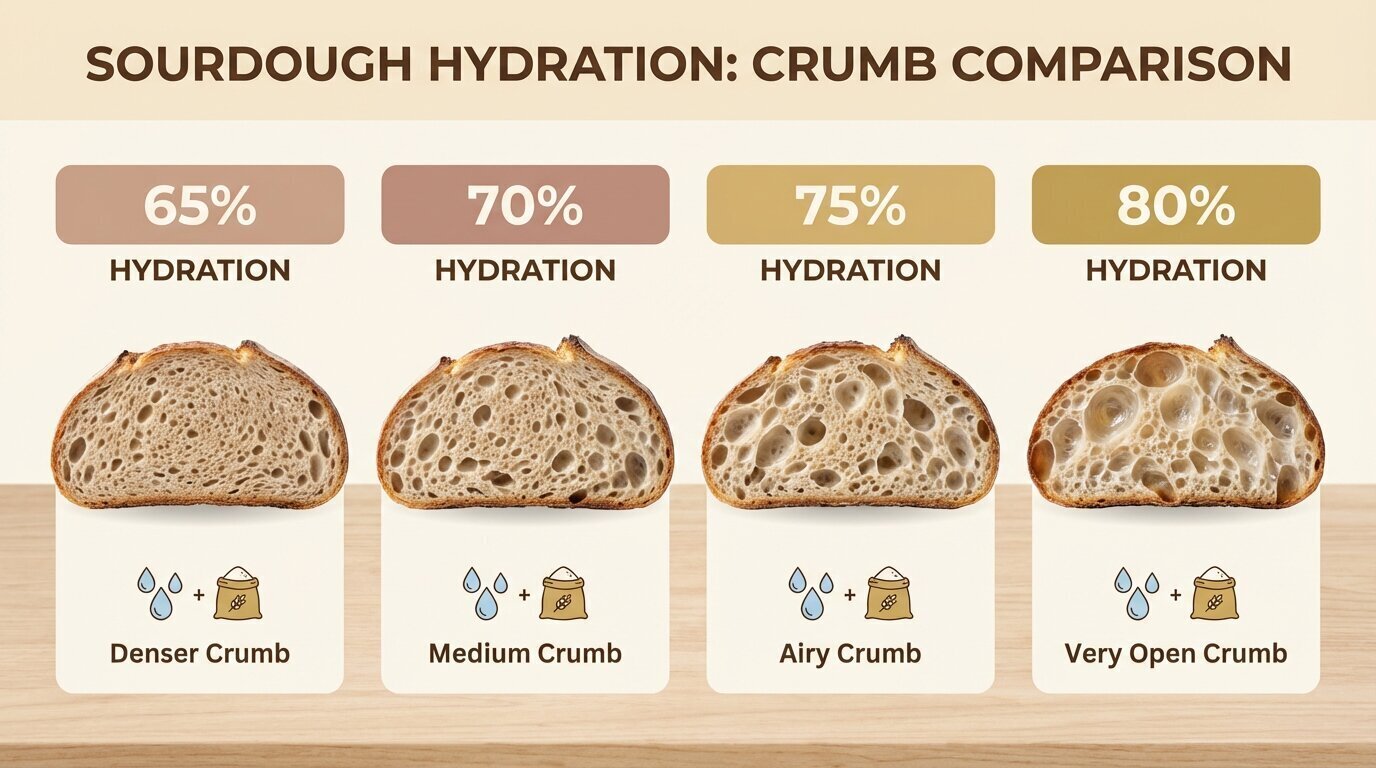
- 65-68% hydration: Beginner-friendly, tight crumb, easy shaping – best first sourdough
- 70-72% hydration: Standard artisan, balanced crumb, manageable handling – most common
- 75-78% hydration: High hydration, open crumb, large holes – requires skill
- 80%+ hydration: Extreme open crumb, very sticky, ciabatta-like – advanced only
- Key insight: Higher hydration = more open crumb BUT harder to handle. Start low, work up gradually.
↓ Full 9-min guide with tested results at each level, handling tips, and exact percentages for every bread type
I baked my first sourdough loaf at 65% hydration. The dough felt smooth and manageable, shaped easily, and produced a beautiful loaf with moderate crumb. Perfect for a beginner.
Then I tried 75% hydration. The dough stuck to everything at first. I wasn’t sure I’d measured correctly. But after four sets of stretch-and-folds, it transformed into this incredibly extensible, alive-feeling dough. When it came out of the oven, the crumb was completely different – huge irregular holes, light texture, dramatic oven spring.
That’s when I understood: sourdough hydration isn’t about better or worse. It’s about choosing the texture and handling characteristics you want.
Hydration percentage determines your sourdough’s final texture more than any other single variable. Change hydration by 10%, and you’re essentially making a different bread.
What Hydration Means for Sourdough
Understanding the foundation
Hydration is the ratio of water to flour by weight, expressed as a percentage. In baker’s percentage, flour is always 100%. So 70% hydration means 700g water per 1000g flour.
For sourdough specifically, hydration affects several critical factors:
- Crumb structure: Higher hydration creates more open crumb with larger, irregular holes
- Handling difficulty: Wetter dough is stickier and harder to shape, especially for beginners
- Fermentation speed: Higher hydration ferments slightly faster due to better enzyme activity
- Oven spring: Wetter doughs generally produce more dramatic rise in the oven
- Crust texture: Higher hydration creates thinner, crispier crusts
- Gluten development: Wet doughs require different techniques – more folding, less kneading
Sourdough hydration typically ranges from 65% (tight crumb, easy handling) to 85% (extremely open crumb, advanced technique). Most home bakers find their sweet spot between 70-75%.
Critical: Starter Affects Final Hydration
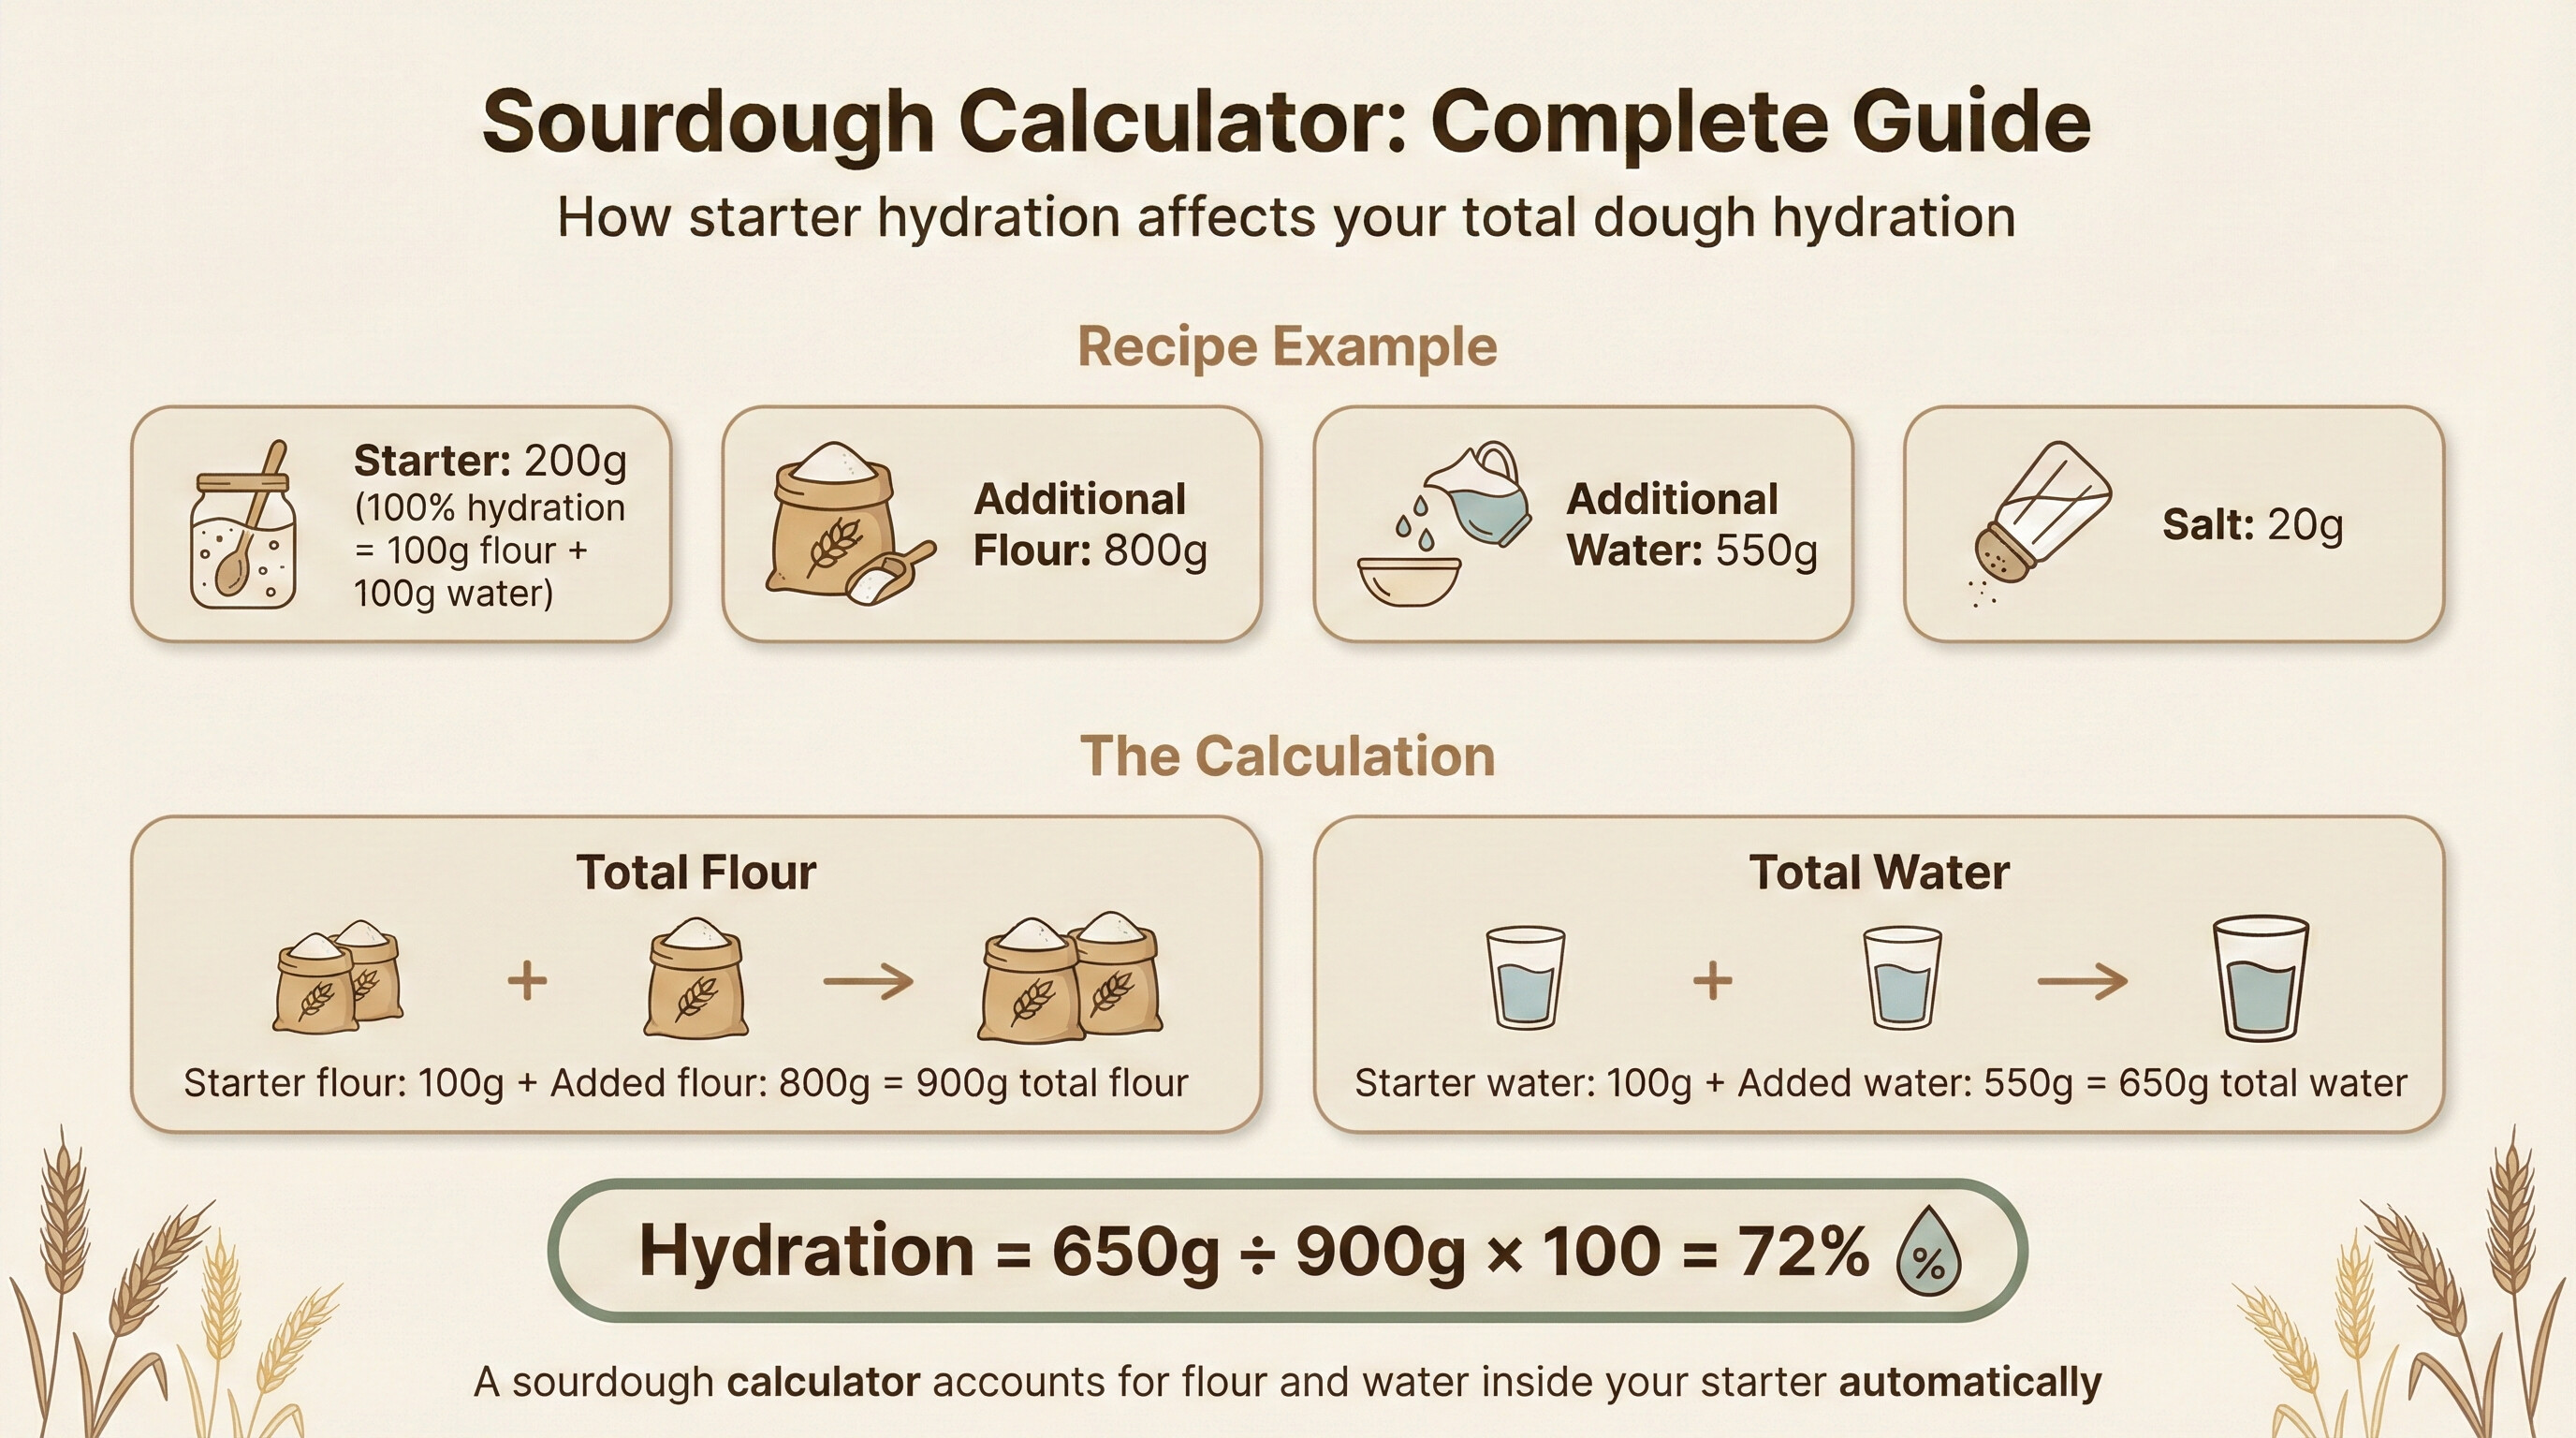
Most bakers overlook this: your sourdough starter contains water that affects final dough hydration. A 100% hydration starter (equal parts flour and water by weight) is 50% water, 50% flour.
Example calculation with 20% starter:
Recipe targeting 70% hydration, 1000g total dough:
| Ingredient | Weight | Flour Content | Water Content |
|---|---|---|---|
| Starter (20%) | 200g | 100g | 100g |
| Fresh Flour | 700g | 700g | 0g |
| Fresh Water | 460g | 0g | 460g |
| TOTAL | 1360g | 800g | 560g |
| TRUE HYDRATION | 70% (560g ÷ 800g) | ||
If you ignored the starter’s water content and calculated 70% as 700g water per 1000g total flour (700g + 100g from starter = 800g), you’d get 87.5% true hydration – drastically different dough!
I made this mistake for my first 6-7 loaves. I was targeting 70% hydration by adding 700g water to 1000g flour, but my 200g starter (100g flour, 100g water) meant my true hydration was 80% (800g water ÷ 1000g total flour). The dough was unmanageable and I didn’t understand why. Once I started accounting for starter water, everything clicked.
All hydration percentages in this guide assume you’re accounting for starter water content. Use a calculator that handles this automatically, or manually calculate total flour and total water including what’s in your starter.
Stop Calculating Hydration Manually
Flourwise handles sourdough hydration calculations automatically, including water content from your starter and preferments.
The calculator does everything:
- Type your target hydration → instant weight calculation
- Add starter → automatic true hydration adjustment
- Accounts for water content in starter and preferments
- Change recipe size → all ratios stay perfect
- Switch between % and g/kg/lb/oz instantly
Charts give you starting points. The app lets you dial in exactly what works for your flour and technique.
Complete Sourdough Hydration Chart
Quick reference for all sourdough types
| Hydration Range | Bread Type | Characteristics | Skill Level |
|---|---|---|---|
| 60-65% | Sourdough Sandwich Bread | Tight crumb, easy to slice, soft texture | Beginner |
| 65-68% | Beginner Sourdough Boule | Moderate crumb, forgiving to shape, consistent | Beginner |
| 70-72% | Standard Artisan Sourdough | Open crumb, good oven spring, balanced handling | Intermediate |
| 72-75% | Country Loaf | Rustic appearance, irregular crumb, hearty texture | Intermediate |
| 75-78% | High-Hydration Sourdough | Very open crumb, large holes, dramatic oven spring | Advanced |
| 78-82% | Sourdough Focaccia | Extremely light, huge air pockets, olive oil pools | Advanced |
| 80-85% | Sourdough Ciabatta | Ultra-open crumb, massive irregular holes, very wet | Expert |
I tested the same recipe at 65%, 70%, 75%, and 80% hydration. At 65%, the loaf had small even holes and sliced beautifully – perfect sandwich bread. At 80%, the crumb was so open you could see through some of the holes, and shaping required confident, gentle movements. Both were excellent breads. Just completely different results from the same recipe.
65-68% Hydration: Beginner-Friendly Sourdough
Where most bakers should start
Beginner Sourdough
Best for: First sourdough loaves, sandwich bread, learning technique
- Dough feels smooth and only slightly tacky
- Easy to shape with minimal flour dusting
- Holds shape well during final proof
- Produces moderate crumb with small to medium holes
- Forgiving of timing errors during fermentation
- Excellent for building confidence before increasing hydration
My Testing Results at 65% Hydration
I tested 65% hydration with 20% starter as my baseline sourdough recipe. For 1000g total flour (including flour from starter), this meant: 800g fresh flour, 200g starter (100% hydration), and 420g fresh water. Total: 1000g flour, 650g water = 65% true hydration.
| Aspect | Observations |
|---|---|
| Mixing | Came together quickly, minimal sticking to bowl sides |
| Bulk Fermentation | Three stretch-and-fold sets were sufficient for structure. Dough felt smooth and elastic by the end. |
| Shaping | Very easy to handle. Pre-shape held structure perfectly. Final shaping was straightforward with light bench flour. |
| Final Proof | Held shape well in banneton. Poke test was easy to read – clear spring back. |
| Baking | Good oven spring. Ear formed nicely. Crust browned evenly. |
| Crumb | Even, moderate openness. Holes were small to medium, fairly uniform. Texture was tender but not fluffy. |
This was my hydration for the first 12 loaves. I needed to build muscle memory for shaping before tackling wetter doughs. At 65%, I could focus on timing fermentation and developing feel for the dough without fighting stickiness. Once these fundamentals became automatic, I increased to 72%.
When to Use 65-68% Hydration
- You’re baking your first 10-15 sourdough loaves
- You want sourdough sandwich bread with tight, even crumb
- You prefer easier handling over maximum open crumb
- Your kitchen is very warm and higher hydration becomes too extensible
- You’re teaching someone to bake sourdough
70-72% Hydration: Standard Artisan Sourdough
The sweet spot for most home bakers
Standard Artisan Sourdough
Best for: Classic sourdough boules, batards, everyday baking
- Dough is noticeably softer and more extensible
- Requires 4-5 sets of stretch-and-folds for structure
- Slightly tacky but manageable with technique
- Produces open, irregular crumb structure
- Excellent oven spring and ear development
- Best balance of texture and handling for experienced bakers
My Testing Results at 72% Hydration
After mastering 65%, I moved to 72% hydration with 20% starter. For 1000g total flour: 800g fresh flour, 200g starter (100% hydration), 520g fresh water. Total: 1000g flour, 720g water = 72% true hydration. This is my current weekly sourdough hydration.
| Aspect | Observations |
|---|---|
| Mixing | Shaggy and wet initially. Autolyse (30-minute rest) made huge difference in dough cohesion. |
| Bulk Fermentation | Required 4 stretch-and-fold sets. Dough transformed from sticky to smooth and billowy over 4 hours. |
| Shaping | Required light touch and minimal handling. Pre-shape required 20-minute bench rest. Final shaping took practice but became intuitive. |
| Final Proof | Dough relaxed more than 65% version. Timing became more critical – 30 minutes difference between perfect and over-proofed. |
| Baking | Dramatic oven spring – loaf grew significantly taller. Beautiful ear formation. Crust had more blisters. |
| Crumb | Open, irregular holes. Mix of small and large air pockets. Light, airy texture. This is the “artisan sourdough” look. |
72% is where sourdough clicked for me. The dough feels alive during stretch-and-folds – you can feel it building structure with each set. The crumb has that artisan bakery look with irregular holes. Slices hold together but have visible airiness. This is my weekly bake hydration after testing the full range.
When to Use 70-72% Hydration
- You’ve successfully baked 10+ sourdough loaves at lower hydration
- You want classic artisan sourdough appearance and texture
- You’re comfortable with stretch-and-fold technique
- You want better oven spring than lower hydrations produce
- You’re ready to practice handling slightly sticky dough
75-78% Hydration: High-Hydration Open Crumb
For experienced bakers seeking maximum airiness
High-Hydration Sourdough
Best for: Show-stopping loaves, Instagram-worthy crumb, experienced bakers
- Dough is very sticky and extensible
- Requires confident, gentle handling at all stages
- Needs 5-6 sets of stretch-and-folds for adequate structure
- Produces very open crumb with large irregular holes
- Spectacular oven spring and ear development
- Timing becomes critical – window between perfect and over-proofed is narrow
My Testing Results at 76% Hydration
I tested 76% hydration (760g water per 1000g flour) after mastering 72%. The technique required significant adjustment.
| Aspect | Observations |
|---|---|
| Mixing | Very wet and shaggy. Autolyse was essential – 45 minutes rather than 30. Dough barely held together initially. |
| Bulk Fermentation | Required 5 stretch-and-fold sets. Transformation was dramatic – built from soupy to structured over 4.5 hours. |
| Shaping | Challenging but manageable for experienced bakers. Required light bench flour and gentle, confident movements. Dough was very extensible. Practice was essential. |
| Final Proof | Very sensitive to timing. Checked every 20 minutes. Poke test was harder to read – dough more forgiving of over-proofing signals. |
| Baking | Explosive oven spring. Dramatic ear that lifted almost vertically. Crust blistered beautifully. |
| Crumb | Jaw-dropping open crumb. Large irregular holes, some big enough to see through. Incredibly light texture. This is show-off bread. |
My first 76% loaf spread flat – I hadn’t built enough gluten structure during bulk fermentation. The second attempt, with an extra fold set and careful timing, produced the most impressive crumb I’d ever achieved. High hydration demands patience and precision, but the results justify the effort. I bake at this hydration when I want to impress guests.
When to Use 75-78% Hydration
- You’ve successfully baked 25+ sourdough loaves at standard hydration
- You want maximum open crumb with large irregular holes
- You’re comfortable with sticky dough and wet-hand technique
- You have time for extra stretch-and-fold sets
- You’re baking for special occasions where appearance matters
Above 75% hydration, technique becomes as important as the recipe. Insufficient gluten development will result in flat, spreading loaves regardless of proper fermentation timing.
80%+ Hydration: Extreme Open Crumb
Expert territory – ciabatta and focaccia
Ultra-High Hydration
Best for: Sourdough ciabatta, focaccia, experimental baking
- Dough resembles thick batter more than traditional dough
- Challenging for beginners – experienced bakers can shape with gentle handling and proper technique
- Often mixed and handled in stand mixer bowl
- Produces massive irregular holes and extremely light texture
- Usually baked in pans or on heavily floured surfaces
- Requires specialized technique and experience
I’ve baked sourdough focaccia at 82% hydration and sourdough ciabatta at 85%. At this hydration, you’re not shaping dough in the traditional sense – you’re gently transferring and coaxing it into position.
The “dough” is barely cohesive. During bulk fermentation, it builds structure through folding, but remains very soft and extensible. For focaccia, I pour it directly into an oiled pan. For ciabatta, I flour the counter heavily, turn out the dough, and use a bench scraper to divide and gently shape pieces.
At 85% hydration, my sourdough ciabatta looked like I’d failed during fermentation – the dough was so wet I questioned my measurements. But after baking, the crumb had holes large enough to stick my finger through. The texture was incredibly light, almost dissolving on the tongue. This hydration isn’t for everyday sourdough, but for specific breads where extreme openness is the goal.
When to Use 80%+ Hydration
- You’re specifically making focaccia or ciabatta
- You have extensive experience with wet doughs
- You’re comfortable abandoning traditional shaping techniques
- You want experimental, ultra-open crumb structure
- You’re baking in pans or with heavy support
How to Choose Your Sourdough Hydration
Match hydration to your experience and goals
Start Here Based on Experience Level
Beginner (0-10 loaves): Start at 65% hydration. Focus on mastering fermentation timing and shaping before increasing hydration. Perfect 65% before moving up.
Intermediate (10-25 loaves): Move to 70-72% hydration. Practice stretch-and-fold technique and handling slightly sticky dough. This is the standard for artisan sourdough.
Advanced (25+ loaves): Experiment with 75-78% hydration. Focus on building strong gluten structure through extended folding. Timing becomes more critical.
Expert (50+ loaves): Try 80%+ for specific breads like focaccia or ciabatta. Master wet-dough handling and non-traditional shaping.
Choose Based on Desired Crumb
- Tight, even crumb (sandwich bread): 60-65% hydration
- Moderate open crumb (beginner boules): 65-70% hydration
- Open irregular crumb (artisan sourdough): 70-75% hydration
- Very open, large holes (show-off loaves): 75-80% hydration
- Extreme open crumb (focaccia, ciabatta): 80-85% hydration
Adjust for Your Flour
All percentages in this guide assume bread flour (11-13% protein). Adjust accordingly:
- All-purpose flour: Decrease hydration by 5-8% (use 62-64% instead of 70%)
- Whole wheat addition (20-30%): Increase hydration by 3-5%
- High-protein flour (14%+): Can handle 3-5% more hydration
- Rye flour addition: Increase hydration by 5-10% depending on rye percentage
I tested the same 72% recipe with three different flours: bread flour (12.5% protein), all-purpose (10.5% protein), and high-protein (14% protein). The all-purpose version was noticeably wetter and harder to handle – I had to drop to 65% to match the handling of bread flour at 72%. The high-protein flour easily handled 75% and produced even better oven spring.
Troubleshooting Hydration Issues
Common problems and solutions
Dough Spreading Flat During Final Proof
Possible causes:
- Insufficient gluten development during bulk fermentation
- Over-fermentation – bulk went too long
- Hydration too high for your flour or technique
- Weak shaping that didn’t create surface tension
Solutions:
- Add one extra stretch-and-fold set during bulk fermentation
- Watch for 50-75% volume increase during bulk, not just time
- Reduce hydration by 3-5% next bake
- Practice tighter shaping technique with more surface tension
Dough Too Sticky to Handle
Possible causes:
- Hydration too high for your current skill level
- Skipped autolyse step
- Insufficient stretch-and-fold sets
- Warm kitchen temperature making dough more extensible
Solutions:
- Use light bench flour and gentle handling movements
- Add 30-45 minute autolyse after mixing flour and water
- Perform one additional fold set during bulk
- Reduce hydration by 5% and master that level first
Dense Crumb Despite High Hydration
Possible causes:
- Under-fermentation – didn’t bulk long enough
- Weak or inactive starter
- Degassing during shaping
- Oven temperature too low
Solutions:
- Extend bulk fermentation time – watch for volume increase, not clock
- Use starter at peak activity (doubled and bubbly)
- Shape more gently – don’t press out all the gas
- Preheat oven and Dutch oven thoroughly (30+ minutes at 475-500°F)
Crumb Too Open and Gummy
Possible causes:
- Over-fermentation during bulk or final proof
- Hydration too high causing structure loss
- Under-baked interior
Solutions:
- Reduce bulk fermentation time by 30-60 minutes
- Watch for 50% volume increase, not 75-100%
- Decrease hydration by 3-5%
- Bake 5-10 minutes longer – internal temp should reach 205-210°F
Conclusion: Start Low, Increase Gradually, Take Notes
After testing sourdough from 65% to 80% hydration, I’ve learned that there’s no single “best” percentage. Each hydration level produces excellent bread with different characteristics.
65% gives you beginner-friendly handling and consistent results. 72% delivers classic artisan texture with manageable technique. 78% creates show-stopping open crumb but demands precision and experience.
My recommended progression:
- Bake 8-10 loaves at 65% to master fundamentals
- Increase to 70-72% for 12-15 loaves to develop wet-dough technique
- Try 75-78% after 25+ successful loaves if you want more open crumb
- Reserve 80%+ for specific breads like focaccia or ciabatta
Document each bake with notes on dough feel, timing, and results. Your perfect hydration depends on your flour, technique, and preferences.
The hydration chart gives you starting points. Your hands and experience will guide you to your optimal percentage. Use a sourdough calculator to handle the math automatically while you focus on technique.
Quick Reference
- 65-68%: Beginner-friendly, tight to moderate crumb, easy handling
- 70-72%: Standard artisan sourdough, open irregular crumb, best balance
- 75-78%: High hydration, very open crumb, requires experience
- 80%+: Ultra-high, extreme open crumb, expert technique needed
- Start at 65% for first 10-15 loaves minimum
- Increase by 3-5% increments, not 10%+ jumps
- Adjust for flour type: whole wheat needs 5% more, AP needs 5% less
- More folds = better structure at high hydration
Frequently Asked Questions
What is the best hydration for beginner sourdough?
Start with 65% hydration for your first sourdough loaves. It’s manageable enough to shape confidently while still producing good oven spring and moderate crumb. Bake 8-10 loaves at 65% to master fundamentals like fermentation timing and shaping technique. After 10-15 successful loaves at 65%, experiment with 70-72% if you want more open crumb.
What hydration produces the most open crumb in sourdough?
Hydration above 75% produces the most open crumb with large irregular holes. In my testing at 78% hydration, loaves had dramatic air pockets and very light texture. However, this requires confident handling and proper gluten development through 5-6 stretch-and-fold sets. Start lower and work up gradually rather than jumping to 75%+ immediately.
Why is my high hydration sourdough spreading flat?
Flat sourdough at high hydration is usually from insufficient gluten development or over-fermentation, not the hydration itself. At 75%+ hydration, you must perform 4-5 sets of stretch-and-folds during bulk fermentation to build adequate structure. Watch for dough that holds its shape and springs back when poked. Also check that you’re not over-fermenting – bulk should stop at 50-75% volume increase, not doubling.